10.01.2012

Quilt in the works!

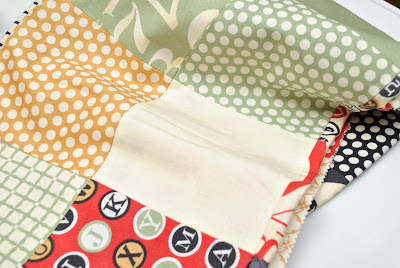
I started a small lap quilt what seems to be forever ago. This is my first quilt that I have ever attempted & so far everything has went smoothly. Sewing all the blocks together seems like it is going to be the easy part. I have had all the materials to finish it except the backing piece. Every time I make a trip to the fabric store I ALWAYS forget to take my quilt front with me to pick out material for the back. :( I plan on going sometime this week to Joann's & will be putting the quilt front in the car RIGHT NOW!! Hopefully, within the next few days I will be able to share the final product with you. But for right now I will give you a small taste of what the quilt looks like so far.


You got to love charm packs.


Man look at those seems!


There are several quilting blogs that have a lot of tutorials & tips on how to make a great quilt......so we will see if I can finish it up!

It has been quite some time since I have made a post & I hope that I can get back on the bandwagon again. With the holidays coming up.....there are lots of things that I would like to make & share with everyone.

3.25.2012

What a storm!

Well, we had the worst storm I have ever been through yesterday. I knew they were calling for
thunderstorms due to the unusually high temps we have been having so far this year but I didn't know that they were calling for this.....


I went browsing the news websites for around our area & came across this photo. My first thought was man where was that at? Only to find that on our way to church this morning surveying the damages in our area that this house was just a few miles down the road from where we live!!! My heart breaks for those that have vinyl siding because it seemed like every house we passed with it looked somewhat like this.

When the storm came I wasn't thinking much of it because I like thunder & all. Well, when the first bits of hail started falling my heart started to pump alittle faster. The hail kept coming & coming & coming........my husband wasn't home at the time (he was just up the road working at the shop) so I gave him a call. He was unaware of what was going on outside because of all the equipment that was running. Things get a bit more scary for me having an almost 2 year old at home. I don't just have myself to protect but another life to protect as well. When I talked to my husband I told him I was headed to the basement. He advised me that was a good place to be! Our poor son really didn't know what was going on........

I wasn't able to watch the news to see what they were calling for because our satellite went out due to the weather.  I did get to talk to my mom & she told me they had tornado warnings out for this area. Daddy & mama just live 15 minutes aways from us but didn't have the same advisory (at least I don't think). At this point I am SCARED!!! My husband isn't home.........I have someone besides myself to take care of...........

The wind is getting up.....hail is still falling (& getting bigger).....branches are falling off the trees......thunder & lightening. Man oh man is our roof going to blow off? What about the windows? The hail is hitting them so hard is one going to break?

So.......I ended up in the basement bathtub! I stayed on the phone with Greg until the storm let up. I am thinking it was 10 minutes or more of straight hail. Saying a prayer while trying to keep our son from getting too worried! He was very still through the whole thing & I still don't know if he knows really what was going on. I asked him this morning if we had a big storm yesterday & all he says is "bath". HAHA.

Well, I just have to say that the good LORD was looking out for us yesterday because it could have been MUCH worse. We ended up with golf ball size hail.....& honestly some could have been even bigger than that! We, still have hail piled in our flower beds. Carsen thought it was kinda cool to eat a few pieces of the hail after the storm.....not sure if that is really good to be eating.

Anyways, that was my excitement for yesterday! Thank you Lord for protecting us! :)

These are a few other pictures I was able to find online.


Wow..........

3.05.2012

Chicken Lasagna

I have to say that this is one of my favorite recipes! One of my friends Judy was kind enough to fix a couple of these casseroles for my freezer when I had Carsen. I have to tell ya it sure was nice to know that I had some good meals in the freezer for the hubby to put in the oven when I came home from the hospital. So if you know  of anyone that may be having a baby or just someone that might need some help with supper one night here is a great meal to take them! :)

Here are the ingredients!

4 cups cooked chicken cut up
6-8 lasagna noodles
16 oz. cottage cheese
1 (10 1/2 oz.) can cream of chicken soup
1 (10 1/2 oz.) can cream of celery soup
2/3 cup milk
1/2 tsp. salt
1/2 cup onion (optional)
3 oz. cream cheese
dry stuffing mix
1/2 cup melted butter

Cook noodles. I mix the chicken, milk, salt & soups together in one bowl & the cheeses in another. Doing it that way makes it alot easier to put together. You are going to layer this the same way you would any other lasagna. I usually start with a small amount of the chicken & soup mix as the first layer just so the noodles are not sitting on the bottom of the pan. Next layer will be noodles, then cheeses & more chicken/soup mixture. You can usually get two layers depending on your pan. Add butter to the stuffing mix for the topping. Bake @ 350* until heated through. As I said before this can be frozen! Enjoy. :)

2.28.2012

Easy Granola Bars

Do you all want an awesome granola bar recipe? Well look no further! My sister-n-law Jessica was kind enough to share this one with me. Thanks Jessica!

I wanted to make something for Carsen as a quick snack. Thankfully he loves these granola bars & they are very healthy for him as well.

I hope that you will enjoy this recipe as much as we do!!


Ingredients:

1/2 cup honey
2/3 cup peanut butter (I used about 1/2 cup)
1/2 cup butter melted
2 tbs vanilla
2 cups quick oats
1/3 cup wheat germ (I added alittle more because its so good for ya)
1/2 cup sunflower seeds
1/2 coconut (optional)
1 cup choc. chips (I used about 1/2 cup)

Preheat oven 350*
Mix first 5 ingredients together. Add remaining ingredients.
Spray 9x13 pan. Smooth even layer of mixture in the pan. Bake for 10-15 minutes until golden brown. Don't leave them in there too long! Cut into squares & enjoy. :) A big cup of coffee makes them even better.


* I think some dried cranberries added in would be yummy too!

2.17.2012

St. Pattys Day Ideas

Alright, so I don't really get into decorating for St. Patricks Day but with it about a month away I thought that I would share a few things that I came across online. So if you are a someone who likes to decorate for St. Patty's Day you would have some fun ideas.

This one is from Tatertots & Jello (you can click on the picture & it will take you right to the tutorial on how to make this)


Here is a cute banner you could hang somewhere!
Great idea from Rebecca @ Simple as that


Umm.......I may have to make these! They are so cute & look very easy to make. Dana from MADE has some really great ideas on holiday decor, handmade clothing, gifts, & fun things for kids!


And we are all ........
(you could use this year round) :)

Please....I would love to have a wreath like this!


Well, hopefully this is enough to get you started!
St. Patricks Day is  March 17th


2.13.2012

Newspaper Baskets

Good Monday morning! :) Last week I worked on a small project using old newspapers. I had plenty from a couple Sundays ago when I had my husband go out & buy 5 papers. What? There were 4 coupon inserts in each newspaper so I wanted to stock up on my coupons. I just know there are going to be some good sales coming in the next few weeks! Hope so anyways. I didn't want to just throw the papers out so I made this..............


I also made a smaller one but I didn't get a picture of it.

Here is a quick tutorial on how to create your own!

Supplies:

Newspapers (I had 5 Sunday)
Glue
Staples
Rotary cutter & Mat


Start by taking the paper to the cutting mat.
I cut off just enough to get rid of the folded edge (you will need individual pieces).


Next you will fold one side (length wise) in half.
Then fold again, & then once more until you have a piece about 1" wide.


Next.... you just start weaving!


In the pictures that you see here I was making the smaller basket so you will need to glue 2 pieces together length wise to get the bigger basket which measures 14x14. The smaller one is 6x10.
Also the measurements kinda depend on how many pieces you weave in.


Whenever I would weave a new piece in I would glue it down. I did find that if you staple the piece together it works really well too. When I reached the sides I ended up only using the staples to hold them  together & then once I was finished with the top I removed all the staples at the end.

I realized that I didn't get any pictures during the
weaving process. :(  What is wrong with me? If I am going to share these things with you I need to get it together! Sorry.There are tons of papers left so I will try & update this tutorial when I start another one.

I did tell you to get a bigger basket like the one above you will have to glue your individual pieces together length wise. For that particular basket I glued 2 pieces together & then ended up having to glue 3 to get around the sides.


I am thinking this will make for some great storage in my craft/sewing room!

Have a great day. :)


2.10.2012

Valentines - Heart Shaped Felt Pouches

We have a Valentines party at church for our Sunday school class. I was needing to come up with something to give each couple that is going to be attending. I could have just went & bought the little box of valentines & been done with it but I wanted to do something a bit more fun! No, I don't want to go to the store & have to buy anything so I looked all over the internet for some fun ideas & came up with these.


I only had to make 25....1 per couple so it didn't take that long.
I happened to have all the felt & embroidery thread on hand already so it worked out great.

You can open these up & put candy inside!


It closes up nicely after the candy is inside.


I think everyone will enjoy them almost as much
as I enjoyed making them!