11.30.2011

Easy Felt Pine Cone Tutorial

This is a simple & pretty quick craft project!
Gather supplies..........
Hot glue gun
Brown felt (i used the 8.5 X 11 sheets)
Scissors
Embroidery Thread (I call it cross stitch thread)
Rotary Cutter & Mat
Small egg shaped Styrofoams


 cut 1" strips from felt
I want to say it took 4 strips per pine cone


I'm not really sure if this has a name but make your
strips look like this! :)


Making a loop....glue a piece of your embroidery thread to one side of you strip.

You only need to do this is you plan on using them for ornaments.


Just start rolling the strip up 


Once your almost done rolling it up put a good bit of glue on the bottom to stick to the styrofoam. Hold this down for a fewseconds because it tends to rise up.


Keep wrapping each new piece around the styrofoam (placing glue at the beginning of each strip). When you reach the bottom it should look something like
this. 


You could add small pieces to the bottom to cover up
the last little bit of styrofoam but found this works just as good.
Cut something like this.............


 Glue in place & there you go!
A very cute pine cone ornament. :)


You could also make a bunch of these & put them in
a clear glass vase which would be very neat.


Right now since I don't have my tree up yet I have them sitting on our mantle with the strings tucked in behind them. I am trying to drag out the Christmas decor this week to put out so my mantle doesn't look so plain.


I thought these would also make neat Christmas
gifts! Trying to think of a fun gift to give a close friend or neighbor? You just might be getting pine cones for Christmas! :)

11.19.2011

Stumbled Across

I was looking for Christmas ideas on the internet & somehow I came to a website with
these really cool pictures. Here are a few. :)


                                                     This says it all!


                                   Old billboard turned swingset.


          When it rains these downspouts actually 
play a song!


                                           This is true........ very true


11.17.2011

Scrabble Pillows

I have seen alot of these pillows & really like them. I may have to try my hand at a DIY
project!


11.16.2011

My fall fashion inspiration

Fall Fashion Ideas are in full swing! :)  Well, I might be a little late with fall it is already the middle of November after all.



Such a cute outfit! Simple yet stylish. Not sure if I could do the glasses & that huge bag! :)


Brown and Red


casual friday


Untitled #9

Don't think that I could pull this outfit off but........


My husband would probably ask me what in the world I was wearing but I think
this outfit is really cute! :)


 Love the braids!


Oh yes I saved the best for last!
I have got to have these :)


                                                                         HAHA!


This post could keep going & going on the many ideas that are out there for fall fashion. I just decided that if I keep finding stuff that I like, it would only make me more sick then I already am! :)


11.04.2011

Yum Lasagna!

I got this idea to do individual lasagnas! I already had the mini loaf pans on hand. :)


I used 1 lb of venison/hamburger & threw in a little pork sausage!
regular size lasagna noodles cut in half works great
ragu (traditional sauce)
ricotta cheese (16 oz)
mozz. cheese


and you cannot go wrong with new york garlic bread sticks!
trust me homemade is always better but I was needing something quick. (got a late start on dinner) :(
Sorry I don't have any dessert. My husband is not a big dessert eater.......which is great because I don't need it!

What are you having for dinner tonight?

10.27.2011

Felt Strawberry Tutorial

Start with about 3" circle. I used a ribbon reel. The two circles you see here will make 4 strawberries.


Cut the 2 circles in half.


Sew your "seeds" with embroidery thread. I used 4 strands. When I make more I think I will try to get
all my "seeds" to go the same direction. I have looked at pictures of strawberries & couldn't decide on whether to use yellow thresad or black thread for the seeds. My husband decided that I needed to use black. I might try it with yellow to see what is looks like. :)


Fold the piece in half (right sides together) sew up the straight side. When your done
turn the right side out.


I failed to take the next picture when you put your polyfil in. oops!
After you have filled the inside sew up the top using the embroidery thread.


Next cut out a top from green felt.


And sew it on! Your all done! yayy they are so cute.


Working with felt is so much fun & I hope to have other tutorials in the future!

10.24.2011

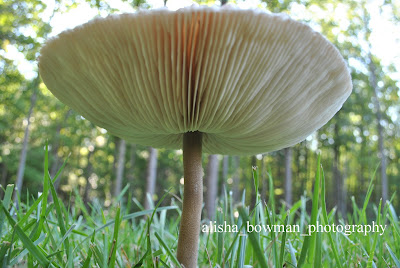
Mushrooms

If you are interested in a printed picture please let me know. :)

I was looking through some photos that I took this year & forgot all about..........


These have got to be some of the coolest mushrooms I have seen in along time.


All photos are property of alisha_bowman_photography
Thanks!

10.23.2011

Frontier Vest

I wanted to try my hand at a frontier vest. I found this on the blog MADE. She has really great tutorials! So this is nothing like Dana's but I can't say that I didn't try. :)


First you start with felt by the yard.  I used the brown for the vest body. I bought 1/2 yard & it was plenty! I can probably make 2 or 3 more out of 1/2 yard. I ended up not using the light brown for this vest. I also picked up 1 sheet of felt (was like $.25) of a golden color for the star.


next cut out your pieces


next I pinned (right sides) together


DO YOU NOTICE ANYTHING I DID WRONG? :)


What in the world was I thinking!!! I sewed the arm holes shut!!!
Made me laugh anyways.


So here comes the seam ripper!


After I got all that figured out I cut a red, & another brown piece of felt to go around the bottom of the vest for the fringe. This will vary depending on how long you are wanting the fringe to be.
Before I put the trim on I tried the vest on my little guy to see where the vest hit.
I did have to trim about 1 1/2 inches off.


 Sew your fringe on but I recommend not cutting the slits in it until you have it attached to your vest!
Next cut a trim piece long enough to go along the front openings of the vest. I cut this 1" wide.


I went online & printed a star outline. Use whatever color you would like for the star "badge". Sew directly on the front of the vest. Make sure your ONLY sewing on the front piece.


You would be done by now but since I messed up the arm holes by sewing them together I decided to go ahead & put trim around them also.

Well here it is all finished!! Yay I am so proud of myself. For all you really great sewers out there DON'T LAUGH!


I had fun making this & hope to make more!
If you use the printable pattern on the MADE
website & your little one is over 12 months. I would suggest making your pattern bigger!
Have fun! :)